Friday, August 23, 2013

Finger Loop Braiding | Kumihimo Flat Braid

You may want to try the Finger Loop Braiding. I found this article a couple of years ago and decided to post here for those who are interested with fingerloop braiding just like the kumihimo braiding patterns we have discussed here.

(Original article from)
Fingerloop Braiding Workshop Blue Skies ’09
by: Gillian Woodruff

Fingerloop braiding has been practiced in various forms for thousands of years around the globe, reaching a peak of refinement in medieval Europe when silk braids were made for laces, purse strings and other adornments. The translation of some old English pattern manuscripts over the last 20 years has renewed interest in this method.

The braiding is performed with fingers holding loops of thread whose loose ends are anchored together. Loops are pulled through others by exchanging them between fingers in a specific way to produce a braided structure. A surprisingly wide variety of braids are possible using this method. Commonly, 5 to 8 loops are worked with 2 hands (although anywhere from 2 to 11 are possible) and larger braids can be made by having two or more braiders working simultaneously. We are starting with one of the simpler 5 loop braids in this workshop (Braid 1 below, the “double herringbone”).

Since a 5 loop braid has 10 interlaced threads, complex-looking braids can be made fairly quickly and easily(with a little practice). However, some downsides are: the worked length is limited by an arm-span (arms must be spread to tighten the braid after each move); the worker must be anchored to the work (although loops can be placed in a holder to pause the work); and it can be very hard to recover without error from dropped loops!

Setting Up A 5-Loop Braid
  • Cut 5 threads each approx. 1 m (40 in) long.
  • Align the ends and fold thread bundle in half; tug on folded end (the loops) while holding loose ends together to smooth out threads and ensure all loops are the same length.
  • Tie an overhand knot near the loose ends, and (optionally) another knot a pencil-width apart to create an anchoring/closure loop.
  • Anchor the knotted end to a fixed point (e.g. tree, rail, table leg, foot, toe…) with some string, or insert a stick to be held by a partner (or between your knees or toes).
  • Place one loop on each finger:
    • Left Hand (Lh): Index (A); Middle (B); Ring (C)
    • Right Hand (Rh): Middle (B); Ring (C)
  • Pattern guidelines:
    • Checks: group all dark colours on one hand, all light on the other
    • Stripes: place same colour on Lh A and Lh C
    • Gradations: place in lightest-to-darkest order: Lh A → Lh B →Lh C →Rh B →Rh C

Braid 1: Double Herringbone (or “Half-Round”) Braid


One of the easiest and most forgiving 5-loop braids. This braid is fairly flat (half-round in cross-section). One side looks woven while the other looks like two side-by-side herringbone braids. Hooking loop C from below as shown will twist the loop so that its lower thread becomes its upper thread after the transfer. The braiding moves are the same from the right and left sides:
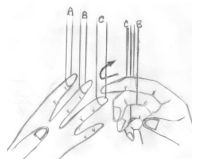
Move 1.  Hook Lh C from below
  1. Rh: pass A through B, hook Lh C from below
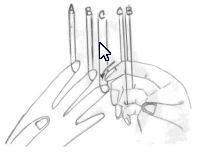
  2. Lh: “walk down” loops (move loop on B to C, and loop on A to B)
  3. Lh: pass A through B, hook Rh C from below
  4. Rh: “walk down” loops (move loop on B to C, and loop on A to B)
  5. Repeat 1. – 4.

Braid 2: Square Braid


A more challenging braid because the picking index finger (A) must pass through BOTH loops on the same hand (B and C) before hooking loop C as before. The braid is square in cross-section, with a herringbone pattern showing along all 4
sides. The braiding moves are again the same from the right and left sides.
  1. Rh: pass A through B & C, hook Lh C from below*
  2. Lh: “walk down” loops
  3. Lh: pass A through B & C, hook Lh C from below*
  4. Rh: “walk down” loops
  5. Repeat 1. – 4.
*TIP for all moves like 1. & 3.: Use your thumb with A to help get the hooked loop back through B and C.

Braid 3: Split Braid

This is a great way to simultaneously braid two identical 5-thread herringbone braids, and only a few moves of this braid will create an opening for a closure or design interest. The picking index finger (A) must again pass through BOTH loops on the same hand (B and C) before hooking loop C on the other hand. However, the loop is now hooked by passing the picking finger A inside the loop C such that the bottom thread is below the picking finger A and gets hooked from above (instead of from below). Hooking loop C from inside as shown will keep the loop untwisted so that its lower thread remains so after transfer. The braiding moves are the same from the right and left sides:
Move 1.  Hook Lh C from inside
  1. Rh: pass A through B & C, hook Lh C from inside the loop (finger A is on top of the lower thread of loop C and hooks it from above)
  2. Lh: “walk down” loops
  3. Lh: pass A through B & C, hook Lh C from inside the loop (finger A is on top of the lower thread of loop C and hooks it from above)
  4. Rh: “walk down” loops
  5. Repeat 1. – 4.

Braid 4: Flat Braid

An attractive flat braid with the same fingerweaving twill on both sides. This is the most challenging braid of these four because the braiding moves are different from the right and left sides (non-symmetric): loops are picked from below on one hand, and from inside on the other hand. After braiding, flatten the braid by tugging the edges outward along the length of the
braid.
  1. Rh: pass A through B & C, hook Lh C from below
  2. Lh: “walk down” loops
  3. Lh: pass A through B & C, hook Lh C from inside the loop
  4. Rh: “walk down” loops
  5. Repeat 1. – 4.

Try This Book To Learn More About Braiding


Resources:
http://www.youtube.com/  Search for “fingerloop braiding” for some instructional videos.
http://fingerloop.org/  A great summary of the method and several patterns, maintained by some members of
the Society for Creative Anachronism (SCA).
http://www.stringpage.com/braid/braid.html A good summary of some basic patterns (in this workshop we
are doing what this site calls the “half-round” braid).
http://takvbowes.et-tu.com/  Order site for Tak v bowes departed - a translated medieval English pattern
manuscript.
http://www.lmbric.net/  A very interesting detailed technical summary of ongoing research on “loop
manipulation braiding” past and present.

Related Posts:
kumihimo square disk instructions
kumihimo stripe pattern
square kumihimo loom
stripe kumihimo pattern
kumihimo patterns with beads

Monday, June 10, 2013

7 Strand Kumihimo Braid Directions

Kumihimo Instructions 7 Strand


I enjoy using this method of performing kumihimo due to the fact there is merely one move to keep in mind, that minimizes the probability of obtaining the steps incorrect. :) However merely placing the strands inside the notches was obviously a little too different for my situation; I certainly not realized whenever i would find a design I appreciated. After a while I actually started to think there is a method to put together the particular completed cord might appear to be prior to I began.

I began experimenting with a few factors and also developed a method to layout patterns. It includes a couple of areas:
1) a diagram along with numbered sections (to demonstrate exactly where particular shades will end up in the design)
2) designated steps on the weaving loom which match together with the sections from the diagram

Prior to being able to create your own design you will need to choose strand you are going to maneuver - your third on the right from the vacant notch or perhaps the third to the left. Therefore it allows you do a few unique designs initially in order to choose the technique is probably the most suitable for yourself. When you have prepared basically it is possible to set numbers on the weaving loom:

Together with two other ways to number the particular weaving loom you will find two various layouts; they may likewise named pertaining to "left" as well as "right" movements. Be sure the particular diagram you have has the exact numbering on the weaving loom.

The design and style procedure depends on the actual diagram, that is a complete 7x7 repeat to get a more impressive snapshot of the design. This specific diagram can be a regular digital picture file. When you save it you are able to both print it and shade it in by hand or even open it in the basic paint software which has a "bucket" tool and fill the sections with anything shades you wish to make use of. Keep in mind: There are actually just seven strands to use - you must use the very same color per number. For instance, each of the blocks having a "1" has to be similar shade, all the sections that has a "2" needs to be exactly the same, and so on.

After you have the particular design created all you need to accomplish is position the strands within the correspondingly designated notches around the weaving loom. Next you begin making the cord.

The following are two empty diagrams - one intended for "left" motions and the other intended for "right.":

Kumihimo Color Patterns

(Left Movement)
kumihimo round braid patterns, kumihimo rattail cord, kumihimo round braid, kumihimo ribbon yarn, kumihimo rattail

Kumihimo Color Patterns

(Right Movement)
kumihimo redondo, kumihimo questions, kumihimo que es, kumihimo cuadrado, kumihimo quadrato

You may want to try this kumihimo string for your next project, just click the photo below:
kumihimo embroidery floss

Related Posts:

Sunday, June 9, 2013

Japanese Braiding: The Art of Kumihimo (Book)

Kumihimo Books


The common Japanese art of Kumihimo will be definitely revealed within this hands-on reference that is certainly ideal for newbies but additionally provides adequate sophistication intended for experienced braiders. Kumihimo braids are created from silk strings and had been initially made use of as ties, cording, as well as belts for clothes and also closures intended for Samurai warriors. Comprehensive step by step pictures offer 6 designs to produce a number of braids, along with advice on tools plus suggestions just for creating the actual designs have been covered. Simply by using a number of designs, shades, and also designs, greater than seventy additional braids enables you to come up with a variety of gorgeous necklaces, bracelets, cords, and also other decorative accents.


Search Terms:
kumihimo tools
kumihimo thread cord
kumihimo techniques
kumihimo table
kumihimo the essence of japanese braiding
kumihimo supplies
kumihimo starter kit
kumihimo spiral pattern
kumihimo silk
kumihimo square plate

Friday, May 31, 2013

Kumihimo Starter Kit

This Kumihimo starter kit provides the supplies you need to get going on your first Kumihimo project! It includes the following: A round braiding disk, easy to follow basic instructions, a mixed pack of beading cord (12 yards total, colors may vary), 8 flexible thread bobbins, gel glue, 1 pack of silver plated findings for finishing the design, and a zippered plastic carrying case to keep everything together.

Note: The loom in this kit is a round loom for round braids only, not the Kumiloom.